A home’s ceiling goes through constant wear and tear. Reproducing damage as soon as possible is important to prevent costly structural issues.
Long, continuous ceiling cracks aren’t just unsightly; they usually indicate serious problems. They can indicate a problem with the attic joists or trusses that needs to be addressed immediately. Contact Ceiling Repair Perth now!
Cracks in a ceiling occur for a variety of reasons. Most often, they indicate normal home settling or the first signs of structural damage requiring professional care and repair. A ceiling crack’s shape, size, and location will provide clues as to what is causing the issue.
Hairline cracks along the edge of a ceiling are typically just a part of the natural aging process and are not a cause for concern. Long cracks that run across a ceiling and down a wall, however, almost always indicate serious structural damage and should be addressed immediately.
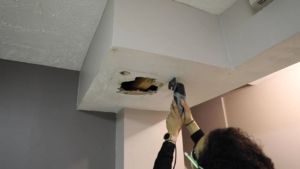
Before attempting any type of repairs, make sure you are comfortable using a ladder and that the room you will be working in is free from furniture and other objects. Lay a tarp or piece of plastic over the area you will be working to catch falling debris and make clean up easier.
Next, remove any debris that has fallen on the ceiling and sweep the floor of the room. Then, set up a ladder, making sure that you can stand on it comfortably and that all four legs are securely on the ground. Place a drop cloth underneath the ladder to catch any falling dust or paint. If the ceiling is drywall, score along the crack with a utility knife and cover it with mesh tape. Apply a thin coat of joint compound over the taped area and sand it smooth. If your ceiling is painted, you can use the same color to recoat the affected area.
Discolored cracks that are accompanied by moisture are an indicator of a water leak in the attic or plumbing problems on the floor above. Moisture damage to a building is not only damaging to the structure, it can lead to mold and mildew growth.
Long cracks that run across a ceiling, and match up with similar cracks on a wall are a sign of structural damage that requires immediate attention from a foundation professional. Such cracks can signal a number of issues including a change in the way a building settles, and that means that other parts of the building could start to shift and show signs of damage as well.
Water Damage
Water damage to ceilings can be a serious issue that needs to be dealt with as quickly as possible. It’s not only unsightly and damaging to the property, but can also lead to long-term structural issues and mold growth.
One of the first things you need to do when you discover a water-damaged ceiling is work out the source of the leak. This will help determine how much immediate repair work is needed and what the best long-term solution may be. The cause of the leak can be anything from a child’s overenthusiastic bath to more serious plumbing issues like a burst pipe. Water can travel a long way before it’s visible, so it’s important to pay attention to the signs of a leaking ceiling and act fast.
Once you’ve found the source of the leak, the next thing to do is stop the flow of water. This means shutting off the water supply if you can and placing a bucket under the drip. If the damage is severe, it’s a good idea to call in a professional to assess the situation and recommend a course of action.
When the source of the leak has been stopped, the next step is to allow the ceiling and surrounding areas to dry completely. This can be a difficult task and will likely require the use of fans and dehumidifiers to speed up the process. It’s crucial that the water-damaged ceiling and surrounding areas are dried thoroughly to avoid any further damage or mold growth.
If a section of the ceiling is badly damaged, it may need to be removed completely and replaced. This can be a complicated process that requires specialist equipment and training, but it’s essential to ensure the structure of the roof and walls is intact and water-tight.
After a thorough clean and drying of the area, it’s time to make any necessary repairs. This may be as simple as spackle and repainting if the damage isn’t too severe, but in more serious cases it could involve replacing drywall sections and installing new insulation.
Sagging
Sagging in a ceiling can be extremely dangerous, especially if it’s left unchecked. This is because a collapsed ceiling can easily cause injury to anyone in the room below, as well as extensive damage to the rest of the property and its contents. As a result, it’s essential to have any sagging in your ceiling repaired as soon as you notice it.
Sagging can be caused by a wide range of factors, including water damage, poor construction and age. In many cases, however, sagging can be addressed by identifying and addressing the underlying issue that’s causing it. For example, if you have water damage in your ceiling, fixing the leaks and repairing any damaged sections of your roof will prevent further sagging in your ceiling.
Alternatively, if your ceiling is sagging due to poor construction, a professional building inspector will be able to identify and recommend the best course of action for you. This may involve reinforcing the joists or adding additional support to the ceiling. In some instances, sagging ceilings may also require the installation of metal ceiling battens in the bottom chords of your roof trusses to increase their strength and resistance to sagging.
Another common cause of sagging is over-insulation, which can put too much pressure on the ceiling frame and joists. Different ceiling types have different load-bearing capacities, so it’s important to ensure you’re using the correct insulation for your home.
If you’re thinking about buying a new home, it’s essential to have a professional building inspection done before making an offer. This will help you to identify any potential problems with the building, such as a sagging ceiling, and can save you a lot of time and money in the long run.
As with any other home renovation project, it’s always best to leave the repair work to professionals who specialize in home restoration. These experts can provide an accurate diagnosis and execute the necessary repairs quickly and efficiently. Their knowledge of construction, structural integrity and aesthetics means they can restore your home to its former glory while ensuring it looks beautiful too.
Cracked or Peeling Paint
A fresh coat of paint can transform a ceiling and give it a brand new look, but when the finish starts to flake or peel, it can be an eyesore. It may also indicate that there are underlying problems in the home that should be addressed as soon as possible.
Cracked or peeling paint usually occurs due to moisture getting between the surface and the layer underneath. Moisture can cause the drywall to decay, so it’s important that it is sealed and prevented from coming in contact with the surface of the paint. This can be done by repairing any water damage, insulating the home, and regulating the temperature.
It’s also important to use high-quality paint to avoid this problem. Lower-quality paints don’t adhere or flex as well, so they are more likely to flake or peel. It’s also a good idea to regularly inspect your ceilings and walls for signs of moisture and to repair any leaks as soon as possible.
The first step in fixing cracked or peeling paint is to clean the area with a sponge and mild detergent. Once the area is dry, it’s a good idea to sand down any uneven areas to create a smooth and even surface for painting. After sanding, it’s recommended that you prime the ceiling with a compatible primer before repainting.
One of the main causes of paint peeling is moisture, and this can occur in specific areas around bathtubs or showers, as well as vent fans, hooks, light fixtures, or any other holes drilled into the ceiling. Using a dehumidifier and ensuring that the room is well ventilated can help prevent humidity from damaging your ceilings.
Before you start working on a ceiling, make sure you have all the necessary tools and materials. This includes a ladder, safety goggles, and a dust mask to protect yourself from the risk of injury or respiratory problems. Plastic or canvas drop cloths are also essential, as they will keep your floors and furniture protected from paint splatters. A scraper, putty knife, and a wire brush are helpful for removing loose or stubborn paint. Sandpaper is also a must, as it will allow you to smooth the ceiling before applying another coat of paint.